Best Ever Waffles

ImageWaffles + Winter = a perfect night in!!

I’ve recently rediscovered a new affinity with waffles and I mean, what’s not to love, soft pillowy cushions of dough drizzled with sweet maple syrup and then dunked into rich chocolate or smothered in vanilla ice cream….oh boy I’m salivating again! I often find though, that when I order waffles from a restaurant or dessert cafe that the waffles themselves are really heavy and doughy, often not quite cooked through in the centre, which for me is super disappointing, especially when waffles are a very once in a while kind of treat (you cant waste a treat on a poorly cooked waffle). So as a result I had just conceded myself to the fact that there were no more waffles for me. But wait, I hear you ask, why can’t you just make some yourself? And right you are! I could make them for myself however I don’t own a waffle iron/press/thingy and I feel that buying one could be rather dangerous to my waistline! This weekend though, my good friend Jamie Oliver revolutionised the way I thought about cooking waffles, suggesting (and showing) that you can actually make them in a griddle pan!! YES!! great success! So after watching the episode (and not writing down the recipe) I found myself following a fan page version of the same recipe.

Essentially, Jamie makes a beautiful fluffy dough, pours it into a hot griddle pan before flipping out a perfectly cooked giant waffle which he then slices into soldiers to be dipped later into hot chocolate. Easy, I thought and on Saturday night I promised my sister that a killer dessert would be served at our girls night in! I was honestly so so excited about the prospect of eating waffles that I pretty much skipped the dinner part of our meal in order to save room for what I imagined were going to be THE BEST WAFFLES EVER!! And finally the time came to get ontomaking them. I decided to halve the mixture as it was just the two of us and diligently followed the fan-page recipe. The final step of said recipe required me to add 1 Tablespoon of bicarb soda, which I thought was quite a lot considering the quantities of the other ingredients. My doubt however, was quelled when the author added something along the lines of “yes I know this seems a lot but i double checked it and a whole Tablespoon is required”. Ok, I thought, that must be right. I let the mixture rest then cooked away before serving what looked like the best waffle I have ever seen. By this stage, I was like a kid at Christmas, filled with so much excitement! This was going to be great! I made melted chocolate pots, scooped ice cream, drizzled maple syrup and cinnamon sugar all over the waffle soldiers before we sat down to eat! Eat your heart out Max Brenner, I thought as I took my first bite….and then I spat it out!

Image

The waffles had a horrible chemical-like taste to them and while the texture was by far, the best waffle texture I have ever experienced, they just tasted horrid! I was so disappointed! They looked perfect, smelt great, were cooked perfectly, had a lightness and fluffy-ness to them….but were just plain gross. Never before had Jamie Oliver failed me in such a way. I was actually a little devastated.  I am very very sad to say that I couldn’t eat mine and lethargically threw them out. My sister (who has a stomach of steel) ate all of hers, all the while telling me they tasted gross and after some more research discovered that the recipe that I had followed had a typo…I was only supposed to use a teaspoon NOT a tablespoon as instructed!

Needless to say, I have learnt my lesson; number 1, follow your cooking instincts . If you think its wrong then it probably is. And number 2, don’t follow fan recipe pages unless you read all of the feed to get feedback from other bakers.

Aside from all of that though, I’d highly recommend using the correct version of Jamie’s recipe (which I later found online!). The results are honestly so good when done correctly. Perfect, fluffy waffles with a crisp outside and a light, well-cooked centre. Hopefully, you’s taste better then mine (which I’m sure they will because lets face it, Jamie is a genius in my eyes). Serve them with melted chocolate to dip and some vanilla ice cream and you cant go wrong!

You can find the original recipe here:

Serves 4:

What you’ll need:

  • 2 free-range eggs

  • 300 ml milk

  • 225 g self-raising flour

  • 2 teaspoons baking powder

  • ¼ teaspoon salt

  • 100 g unsalted butter, melted and cooled

What to do:

1. Crack the eggs into a bowl, add the milk and whisk to combine. Sift in the flour, baking powder and salt then whisk until fully combined. Add the cooled melted butter and gradually stir it through the mixture. It’s important not to stir the mixture any more after this or your waffles may be tough. Leave to rest for about 20mins so that it begins to form air bubbles throughout. It looks a little like a bread dough at this stage.

Image

2. Place your griddle pan over a high heat, add some butter/spray with non-stick spray and pour in the waffle batter, spreading it around to fill the pan using a spatula. Jamie suggests that you could also make smaller waffles, if you prefer – just do 2 at a time.

Image
3. Lower the heat to medium-low and cook the waffles for around 6 minutes, or until lightly golden on the bottom. Flip over and continue to cook for around 6 minutes, until golden and cooked through.

Image

4. Turn out onto a cutting board and use a sharp knife to cut into soldiers, or whatever shape you like. Serve with fruit, melted chocolate or ice cream and drizzle with maple syrup.

Enjoy and Happy Baking!!

Image

Chocolate Muffins with a Gooey Caramel Surprise

ImageLately I’ve been watching a lot of Masterchef so I decided to give myself an invention test challenge! My sister needed something sweet to take to a friends house and I knew that mum had bought an extra tin of condensed milk (it was on sale this week) so with that i decided something with caramel had to be done. My sisters friend also loves chocolate so I came up with Chocolate Muffins with a caramel centre. Now normally when I cook I tend to look at a variety of recipes and then put together the best components to make my own recipe, but on this occasion I decided to go completely blind just to challenge myself! And it turned out a treat! Beautiful light and fluffy muffins, filled with a rich sweet caramel centre! What more could you want!

I used what I knew about muffins as the basis for my chocolate cake mix (essentially; flour, milk, eggs, sugar, butter & cocao powder) and then used the recipe for caramel that I would normally make for caramel slice! Simple! I also wanted to give my bake a bit of trendy finesse, so instead of using paper muffin tins I decided to use baking paper squares pressed into my muffin tin.

Once the muffins were cooked and cooled I then cut a little hole in the centre, into which I then spooned my caramel mixture! Wow what a combination! I also re topped the hole with the cake that I had removed earlier and then put a nice big blob on top of the whole thing! Overall, I was really pleased and impressed with my bake, especially as it was one of the first times I really went without any guidance on my cooking (even though it was just muffins). I would highly recommend giving this recipe a go, and maybe even adding some salt to the caramel if your a fan of salted caramel like me. Another great reccomendation would be to heat the muffins slightly before eating them so that the caramel melts a little! mmm yum!

Hope you enjoy this one as much as I did!

What you’ll need:

2Tbs Cocoa Powder

1 Cup self raising flour

1/2 cup sugar

1 egg

80g melted butter

1 cup milk

1 tin condensed milk

1Tbs butter

2Tbs golden syrup

What I did:

1. Preheat your oven to 180 degrees C. Sift your flour and cocoa powder, then add your sugar, egg, melted butter and milk. Mix on a low speed with an electric mixer until combined then turn up the speed for about 2mins until the mixture is light a fluffy.

Image

2. Lightly spray your muffin tin with non-stick spray then line with squares of baking paper (you could use pre-bought muffin cases). Divide the mixture between 6 muffins and then pop into the oven. They should take about 15mins but test with a skewer to ensure that they are fully cooked. Leave to cool completely.

Image

3. Meanwhile, add your condensed milk, butter and golden syrup to a saucepan and cook over a low heat. Remember to stir constantly so that it doesn’t burn or get stuck to the bottom. Continue until the caramel turns to a nice dark rick colour.

4. Allow the caramel to cool.

5. Using a sharp knife, cut a small hole into the top of each muffin, keeping the cut out piece of cake. Spoon or pipe your caramel into the hole and then re-top with the cake piece. Add a nice dollop of caramel to top the whole thing off!

Image

Image

Image

Enjoy and Happy Baking!!

Caramel Slice…its just too Nice!!

Image

Caramel Slice would definitely have to be a family favourite in my household. Actually, come to think of it, anything caramel is a favourite! So when my sister asked me to bake something for her works Biggest Morning Tea it was the first thing that came to mind. Here in Australia, families and business around the country host a Morning tea to raise funds for Cancer research, collecting donations for a great cause! I was so excited to be able to help contribute through something that I myself love to do.

I actually received this recipe off my best friend, who herself had got it off her grandma (grandma’s always know the secrets to great cooking!) and I’ve made it quite a few times! When I recieved a copy of it, it was handwritten in beautiful cursive writing, a perfect sign of a recipe that was certainly going to produce beautiful old fashioned baked goods! The last two times I’ve made it though, I have made a few slight changes and I think I’m finally happy with a recipe that is super easy and super tasty. What I love about this slice is that the base is soft and chewy while the caramel centre isn’t overly sweet. Using dark chocolate on top also helps to balance the whole thing out so I’d recommend staying away from milk chocolate. This recipe is also really great as its really quick to make and kids can get involved too. A perfect lunch box treat if I do say so myself..that is if any slices make it to your lunch box!!

So here it is, my version of a great classic, Caramel Slice (based on one I received from a beautiful friend and her wonderful family!!)

What you need:

1 Block Dark chocolate (200g)

For the Base:

1 Packet Arnotts Butter Snap Cookies

1/4 cup desiccated coconut

115g butter (melted)

For the Caramel:

1 tin condensed Milk

2 Tbs golden syrup

1 Tbs butter

What I did:

1. Preheat your oven to 200 degrees C. Then use a food processor to turn your butternut snap cookies into a fine crumb (if you don’t have one you can always do this by hand by putting your biscuits into a bag and hitting it with a rolling pin. It may just take a little longer). Then add your coconut and melted butter and pulse until the mixture looks like wet sand.

2. Line your baking tin with greaseproof paper and tip your crumb mixture into it. Using the back of a spoon, press the mixture firmly and evenly around the tin to form your base. Then pop it into the fridge (this part is very important as it prevents you getting biscuit crumbs in your caramel later! Trust me, don’t skip it!) 

 Image

2. While your base is setting in the fridge, pour your condensed milk, butter and golden syrup into a saucepan and put onto a medium-low heat. Stir it continuously until it turns into a nice golden caramel colour. Its really really important that you don’t stop stirring this mixture as it will burn so easily and leave you with a caramel that has burnt bits in it. Also make sure you stir right to the edges of the pot so it doesn’t stick. This bit can take a while as you need to work with a low heat but stick with it. 

Image

3. Pour the caramel over your base and pop the whole thing into the oven for 10minutes.

Image

4. Remove from the oven and allow to cool completly. Once cooled, melt your chocolate in a bowl over a simmering pot of water. Pour over the caramel and set the whole thing in the fridge (1hr) or freezer. Use a sharp knife to cut into squares before serving

Image


Image

Enjoy and Happy Baking!!

Triple Chocolate Cheesecake

ImageSo I am fairly certain that anything with three types of chocolate in it will always taste delicious, regardless of what it is. Add to that the fact that the chocolate will make up a beautiful rich cheesecake and you’ve got yourself a winner! Last weekend I decided to cook a three course lunch for my mum for mothers day and knowing that she loves all things chocolate and cheesecake I knew what the dessert had to be. But the question remained….how to do it?? 

I often steer away from making no bake cheesecakes after a previous experience which didn’t end up to be very successful. During that attempt, the recipe asked me to use gelatine powder to set the cake (again a chocolate cheesecake). Now either I was a bit heavy handed with the gelatine or the recipe itself was a little (or a lot) off but what I ended up with was a very dense, very firm cake that was a huge let down in all areas! After that time I thought that I would just steer clear of the gelatine set type cakes and stick to the baked cheesecake. 

Thankfully though, my approach changed completely after watching an episode of MKR (yep another recipe from this show! I’m sorry but I really love it!) where two contestants (QLD’s Paul and Blair) created what looked like a beautiful triple chocolate cheesecake. Aside from the fact that the recipe seemed very simple, the two dad’s are self confessed “non-dessert” people, so I thought that my chances of success would be slightly higher (it was one of those, “if they can do it so can I moments”). So off I went on a path of determination!

And luckily, I was NOT disappointed! Wow! what a recipe! The base is a lovely crumbly mixture that combines the flavours of chocolate, walnuts, dates and honey to make something really really special. The cheesecake mixture itself is beautiful, light, and creamy, with pockets of sour raspberries to cut through the rich flavours. Honestly, this would have to be the lightest, most delicious cheesecake I have ever ever eaten! If thats not proof enough, my family have continued to eat it every day this week and their still not sick of it! I promise you will love this one. It’s easy, tasty and so more-ish! The only issue that I had was that I think I used a slightly smaller cake tin then the recipe required, which meant I had a little leftover of the milk chocolate layer. I put this into another tin though to make a mini cheesecake, which my sister and boyfriend happily devoured as “chef-specials”!

Image

So here it is, the recipe for Triple Chocolate Cheesecake (original found here):

Ingredients

  1. Melted butter, to grease
  2. 300g plain chocolate biscuits
  3. 180g (1½ cups) walnuts, finely chopped, toasted
  4. 10 dates, pitted (Soak in boiling water to soften for about 15mins)
  5. 100g coconut oil
  6. 2 tbs honey

Filling:

  1. 750g cream cheese, softened
  2. 100g caster sugar
  3. 300ml thickened cream
  4. 200g white chocolate, chopped
  5. 200g milk chocolate, chopped
  6. 200g dark chocolate, chopped
  7. 3 tsp powdered gelatine
  8. 125g fresh raspberries, plus extra, to serve (I used frozen)

Method:

1. Grease a 23cm cake pan with removable base with melted butter. Process biscuits and nuts in a food processor until the mixture resembles crumbs. Add dates, coconut oil and honey and process to combine. Press mixture over base and sides of prepared pan and refrigerate until needed.
 Image

2. To make the filling, using an electric mixer, beat cream cheese and sugar (on medium speed) until smooth and combined. Add cream and beat until smooth. Set aside.
3. Fill a small saucepan one-third full with water and bring to a gentle simmer. Place the white, milk and dark chocolate in separate small heatproof bowls. Working with one bowl at a time, place over pan and stir until chocolate has melted (don’t let the bowl touch the water). Allow to cool.
4. Place 60ml boiling water in a small heatproof bowl and sprinkle over gelatine. Stir until dissolved. With the motor running, gradually add to cream cheese mixture and beat to combine. Add a third of the cream cheese mixture to each bowl of melted chocolate and stir to combine.
5. Pour dark chocolate layer over chilled cake base. Dot with raspberries, then freeze for 5 minutes. Top with milk chocolate layer and freeze for 5 minutes. Top with white chocolate layer and refrigerate for 4 hours or overnight to set.Image
6. Slice cheesecake and place on serving plates.
Image
I served mine with a raspberry coulis (cooked frozen raspberries with a bit of sugar and lemon juice to make a syrup) which is a lovely accompaniment!
 
Happy Baking and Enjoy!
Image


Death By Chocolate

Image

Last night my friends and I went on what we like to call a “Food Safari”! Basically, we all have a huge passion for food (eating it and cooking it of course!) and so spend hours catching up every few months at a different eatery around Sydney. Despite the fact that we all live in the same area, we are more then happy to travel for great food, which is exactly what we did last night! Of course, as it is Easter, what better opportunity to venture to Brighton Le Sands to make a visit to Bay Vista, a chocolate cafe (who really needs an excuse anyway!)

Luckily, two of my friends had been before, so they were able to advise on whats what and thank goodness they did because the menu choices are HUGE!! Thankfully, I was also encouraged to go with an empty belly so as to leave optimum room for dessert, which is exactly what I did!

When you arrive at Bay Vista, you enter a warm chocolate coloured room with low lighting that provides a nice intimate feeling. A perfect location for eating rich chocolatey desserts. I could honestly smell the chocolate from the moment I entered the room, and not in a sickly way that was overpowering, but more in a subtle way that was warming and a little exciting. If that didn’t get my taste buds watering then the huge chocolate fountain filtering silky, shiny milk chocolate most certainly did! mmm yum! As I mentioned earlier, the menu is absolutely HUGE! Who would have realised that there were so many ways to eat and serve chocolate! Additionally, there is a savoury menu but hey, who has time for that! Cleverly, the owners have divided the menu for your convenience into areas including Crepes, Ice Cream, Frozen Yogurt, Drinks, Pancakes, Waffles and Ice Cream Bowls (and yes all of these are on offer for you to choose from!) Of course, for someone as indecisive as me this proved a huge problem…where do I even start! Never fear though because I had a plan. I firstly agreed with myself that I wanted 

Image

something with chocolate, preferably including ice cream and with something hot like a crepe or waffles. As my sister was with me we also agreed to share two things (that way you get the best of both worlds) and then finally eliminated waffles based on the idea that after past experiences at other venues, waffles can be a bit doughy (although they did look amazing and I think next time I go, I’ll give them a try). And there you have my fail-proof process of elimination! The only step was now to decide which crepe and ice-cream bowl we wanted (trust me, this then took a while) but eventually we agreed on the Snickers Crepe ($16) and the 5th Avenue New York Ice Cream Bowl ($24).

To be honest, the Snickers Crepe was my favourite of the two! A huge, thinly cooked crepe filled with Snickers pieces and roasted peanuts, then drizzled with chocolate and caramel sauce! The dish was served with a nice big scoop of vanilla ice cream and dusted with icing sugar! Wow! This was soooo tasty I could have eaten it all day! I loved discovering little pieces of chewy nougat throughout my crepe and the roasted peanuts added a nice little crunch. A very tasty option which I would highly recommend.

Our second dish was the Ice Cream Bowl which was served in the biggest parfait glass I have ever seen! Inside the bowl we had a scoop each of peanut butter, chocolate and boysenberry ice cream topped with another scoop of soft serve vanilla ice cream and some whipped cream (if there Imagewasn’t enough cream for you yet!). Scattered throughout were pieces of chocolate brownie and new york cheesecake before being drizzled in chocolate fudge sauce! Wow what a dish! Now I know that that sounds irrisitable on paper, and trust me it was, I had a few reservations about it. Firstly, if your ordering this then I would certainly share it with a friend and order something on the side like we did. Also make sure that you like cream, not ice cream but cream, because they put an awful lot of it on the top, which there’s nothing at all wrong with, I’m just not a huge fan of cream. My other sense of confusion was the inclusion of boysenberry ice cream, which didn’t seem to fit with the rest of the flavours included. Perhaps it should be replaced with something more caramel-like? Despite that thought, the chocolate fudge sauce was rich and gooey and the brownie pieces with the ice cream was just delish! I loved the peanut butter ice cream, in fact I wish they had given us a bigger scoop of that one, which had a very subtle peanut butter flavour (so don’t worry about it being too rich) and fantastic creamy consistency. Although we shared ours, I did see lots of people finish a whole one on their own so I’m sure if you’ve got a sweet tooth you would be able to manage! Overall, so much yummy-ness in one big bowl!

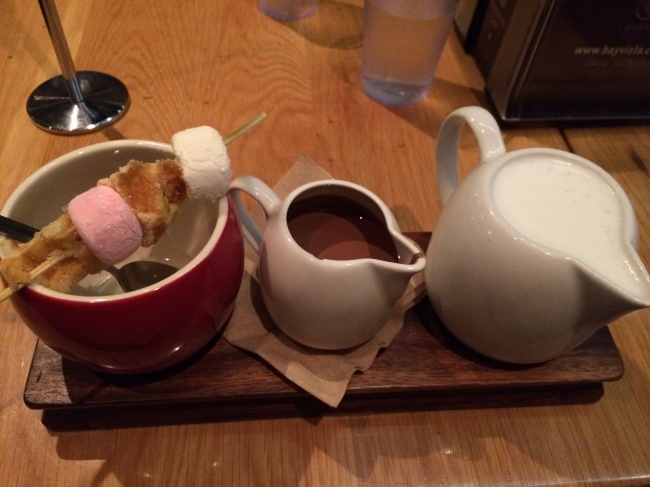
After a good rest we all got a hot chocolate ($6) which I would very much recommend as almost a meal in itself! Three cute little serving dishes were presented to me; one empty mug, one filled with warm frothy milk and the last with rich, silky milk chocolate. Then, if that wasn’t enticing enough, a skewer was placed across my cup with alternating waffle pieces and marshmallows! It was like a chocolate fondu AND hot chocolate in one! Great value! I decided to use mine for that exact purpose but in the end couldn’t quite finish it off as I slowly slipped into a food coma (a fact that I deeply regret now!)

Image

Overall, I would highly recommend a visit to Sydney’s Bay Vista! Be prepared for beautiful rich dessert dishes which will take you quite some time to decide upon. You may even need to have a little system like I did before you go!! Either way, you won’t be disappointed! I’m already counting down until I go again!!

PS. Check out their website here!!

Enjoy!!

Ricotta, Almond and Lime Cake

I love Ricotta cakes!! They are so light and fluffy and best of all creamy and when used correctly really lift any basic cake recipe to make it something really special. I’ve mostly heard of people using Ricotta in baking to make a ricotta cheesecake (also very very delicious) but on Friday I caught an episode of Good Chef Bad Chef that really got my attention. The shows host Adrian Richardson was baking a beautiful Ricotta, Almond and Lime Cake which just looked divine! So moist and fluffy I was actually salivating watching the whole thing!Image

It was also quite perfect as I had a family picnic planned for the next day (sadly the weather did not agree) and I was hoping to make something sweet to take along. What I really really love about this recipe is that it is so unbelievably moist and light, which is perfect for a Sunday afternoon tea or picnic in my case. Its also not overbearingly sweet, so it’s perfect for more mature taste buds and is gluten free. On top of all of that, it uses ingredients that most people already have in the pantry, making it quick and simple to make! 

I’m going to include the recipe below but again, please remember that this one isn’t my own so I most definitely (and sadly) can not take credit for the flavour explosion that is about to occur in your kitchens once you give it a go! One thing that I think might add to the whole cake for next time (if you were going to perhaps serve it as a dessert at home with a scoop of thick clotted cream or ice cream) might be a lime sugar syrup (lime juice, sugar & water), poured over the cake as soon as it comes out of the oven. A bit like a Greek style semolina cake. Anyway, the choice is yours because either way this cake is heavenly!! 

What You’ll Need:Image

250g ricotta cheese (I used light)

4 eggs, separated

1 tsp almond extract or amaretto

175g caster sugar

2 cups almond meal

Finely grated rind of 1 lime

¼ cup flaked almonds

¼ cup pistachio, chopped

What I Did:

1. Preheat your oven to 150C. Grease and line the base and sides of a 20cm loose bottom cake tin.

2. Beat together the ricotta, egg yolks, almond extract and sugar in an electric mixer until smooth. Stir in the almond meal and lime zest.

3. Whisk the egg whites in a clean, dry bowl until soft peaks. Fold 1/3 of the egg whites into the ricotta mixture to loosen, then fold in the remaining. Spread into the tin, sprinkle with the almonds and pistachios, and bake for 30-40 minutes until golden and a skewer comes out clean.Image

4. Cool slightly, then turn on to a wire rack. Cool completely and then serve with a dollop of clotted cream, ice cream or as it is. (If adding a sugar syrup I would do this now, as soon as you take it out of the oven. Simply pour the syrup slowly over the top and let it absorb into the cake as it cools).

(Recipe taken from http://www.goodchefbadchef.com.au/recipes/785-ricotta-lime-and-almond-cake).

Enjoy and happy Baking!!

Image